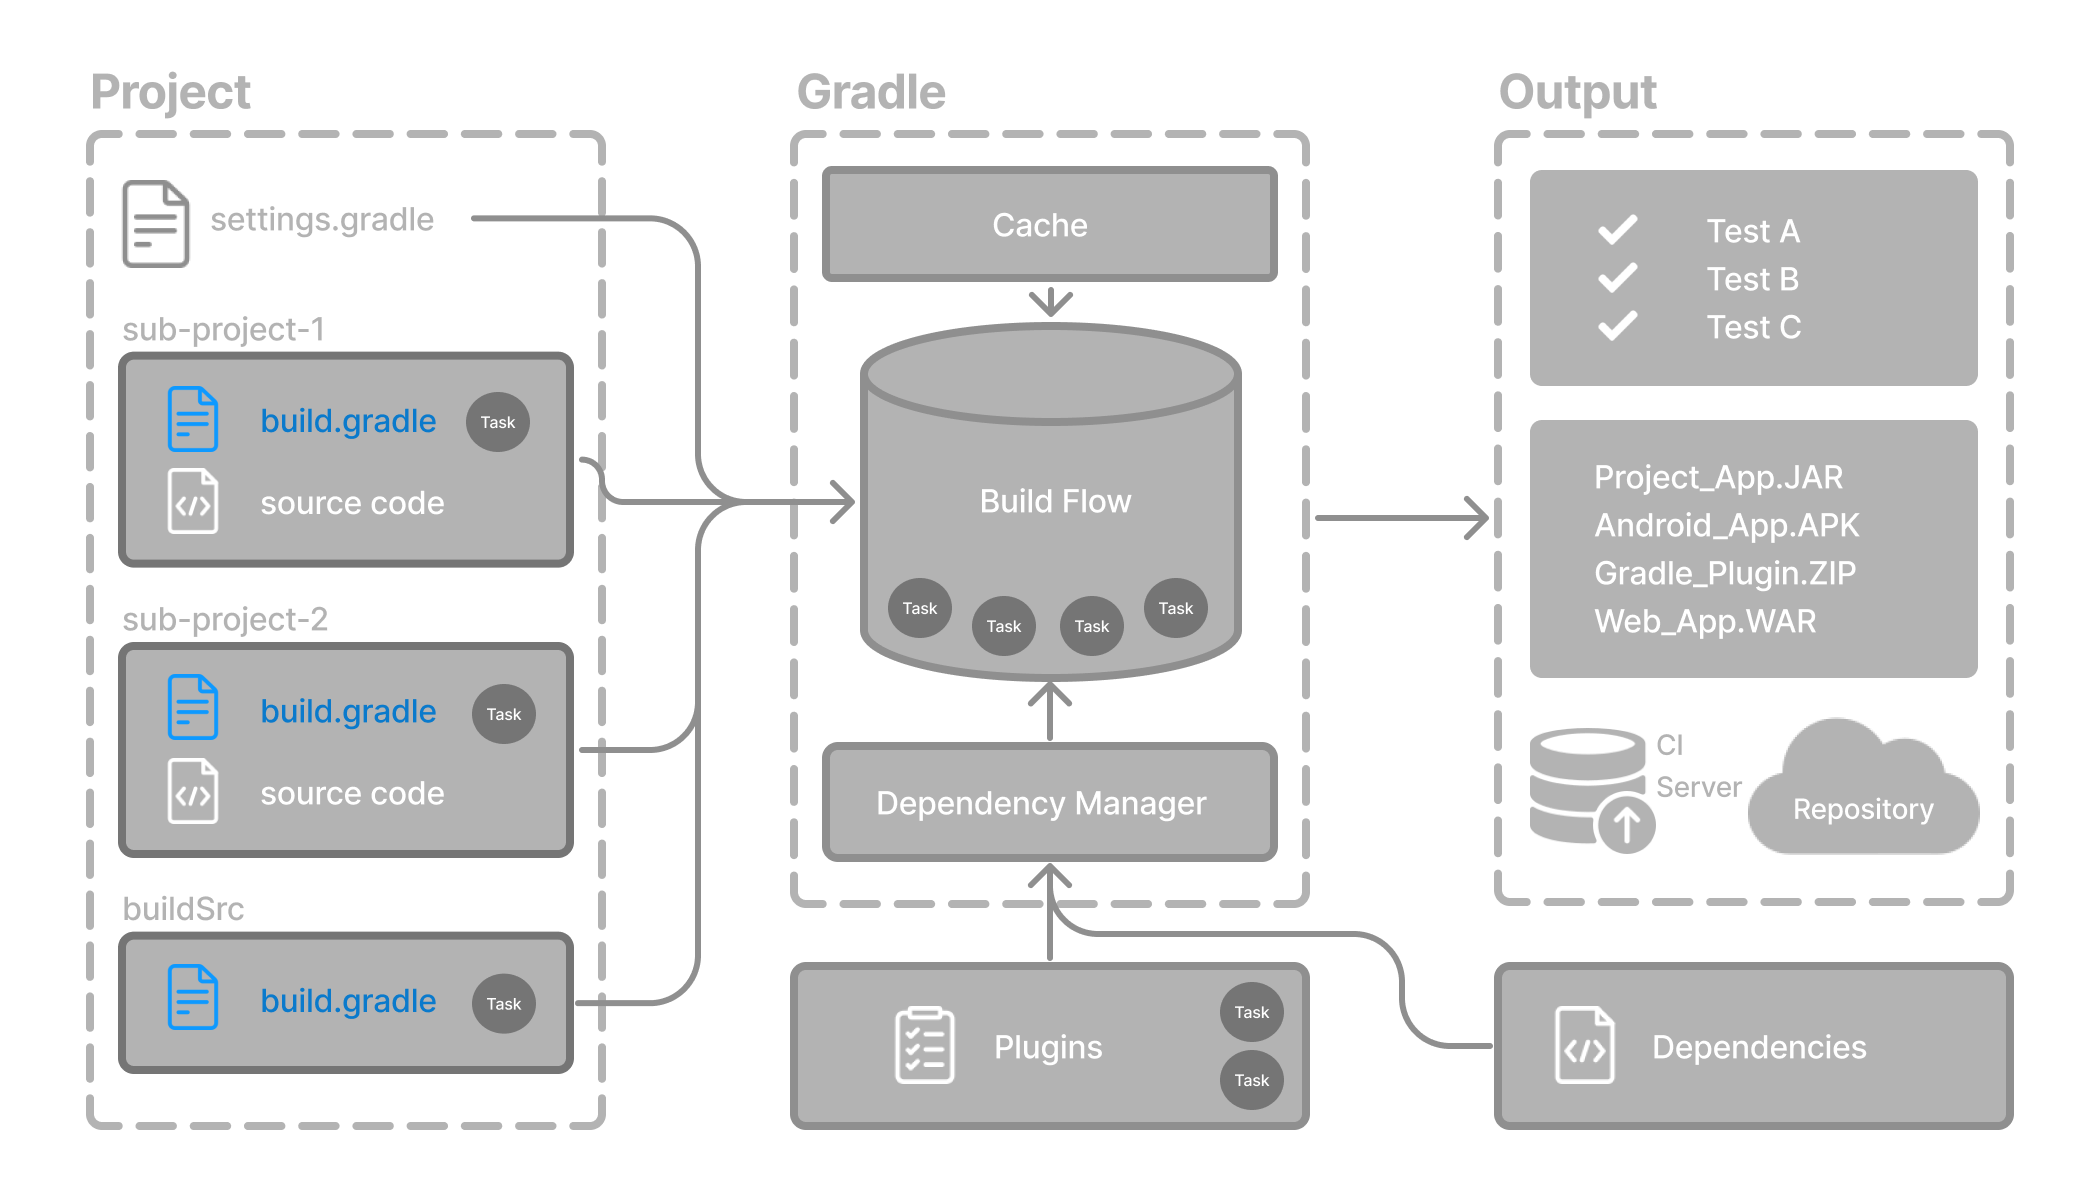
Writing Build Scripts
The initialization phase in the Gradle Build lifecycle finds the settings file.
When Gradle evaluates the settings file, it creates a single Settings instance.
Then, for each project declared in the settings file, Gradle creates a corresponding Project instance.
Gradle then locates the associated build script (e.g., build.gradle(.kts)) and uses it during the configuration phase to configure each Project object.
Anatomy of a Build Script
Gradle build scripts are written in either Groovy DSL or Kotlin DSL (domain-specific language).
The build script is either a *.gradle file in Groovy or a *.gradle.kts file in Kotlin.
As a build script executes, it configures either a Settings object or Project object and its children.


There is a third type of build script that also configures a Gradle object, but it is not covered in the intermediate concepts.
|
Script Structure
A Gradle script consists of two main types of elements:
-
Statements: Top-level expressions that execute immediately during the initialization (for settings scripts) or configuration (for build scripts) phase.
-
Blocks: Nested sections (Groovy closures or Kotlin lambdas) passed to configuration methods. These blocks apply settings to Gradle objects like
project,pluginManagement,dependencyResolutionManagement,repositories, ordependencies.
Examples of common blocks include:
plugins {
    id("java")
}

repositories {
    mavenCentral()
}

dependencies {
    testImplementation("junit:junit:4.13")
    implementation(project(":shared"))
}plugins {
id 'java'
}
repositories {
    mavenCentral()
}
dependencies {
testImplementation "junit:junit:4.13"
implementation project(':shared')
}In this case, we are looking at a build script.
Therefore, each block corresponds to a method on the Project object, also referred to as the Project API, and is evaluated with a delegate or receiver (more on that below).
Closures and Lambdas
Gradle scripts are based on dynamic closures in Groovy or static lambdas in Kotlin:
-
In Groovy, blocks are closures, and Gradle dynamically delegates method/property calls to a target object.
-
In Kotlin, blocks are lambdas with receivers, and Gradle statically types the
thisobject inside the block.
This delegation allows concise configuration:
repositories {
    mavenCentral()
}
In this case, the repositories {} block is a method call where the closure configures a RepositoryHandler instance.
repositories {
mavenCentral()
}In this case, the repositories {} block is a method call, and the lambda configures a RepositoryHandler instance.
Inside the block, mavenCentral() is a method on that receiver, so no qualifier is needed.
Delegates and Receivers
Every configuration block executes in the context of an object:
-
In Groovy, this is the block’s delegate.
-
In Kotlin, this is the block’s receiver.
Inside the dependencies {} block, for instance, the implementation(…) method is delegated to the DependencyHandler:
dependencies {
    implementation("org.jetbrains.kotlin:kotlin-stdlib")
}
This behavior allows intuitive configuration but can sometimes obscure where a method is coming from.
For clarity, you can use explicit references like project.dependencies.implementation(…).
Variables
Build scripts support two types of variables:
-
Local Variables
-
Extra Properties
Local Variables
Declare local variables with the val keyword. Local variables are only visible in the scope where they have been declared. They are a feature of the underlying Kotlin language.
Declare local variables with the def keyword. Local variables are only visible in the scope where they have been declared. They are a feature of the underlying Groovy language.
val dest = "dest"

tasks.register<Copy>("copy") {
    from("source")
    into(dest)
}def dest = 'dest'
tasks.register('copy', Copy) {
from 'source'
into dest
}Extra Properties
Gradle provides extra properties for storing user-defined data on enhanced objects such as project.
Extra properties are accessible via:
-
extraproperty in Kotlin.
-
extproperty in Groovy.
plugins {
    id("java-library")
}

val springVersion by extra("3.1.0.RELEASE")
val emailNotification by extra { "build@master.org" }

sourceSets.all { extra["purpose"] = null }

sourceSets {
    main {
        extra["purpose"] = "production"
    }
    test {
        extra["purpose"] = "test"
    }
    create("plugin") {
        extra["purpose"] = "production"
    }
}

tasks.register("printProperties") {
    val springVersion = springVersion
    val emailNotification = emailNotification
    val productionSourceSets = provider {
        sourceSets.matching { it.extra["purpose"] == "production" }.map { it.name }
    }
    doLast {
        println(springVersion)
        println(emailNotification)
        productionSourceSets.get().forEach { println(it) }
    }
}plugins {
id 'java-library'
}
ext {
springVersion = "3.1.0.RELEASE"
emailNotification = "build@master.org"
}
sourceSets.all { ext.purpose = null }
sourceSets {
main {
purpose = "production"
}
test {
purpose = "test"
}
plugin {
purpose = "production"
}
}
tasks.register('printProperties') {
def springVersion = springVersion
def emailNotification = emailNotification
def productionSourceSets = provider {
sourceSets.matching { it.purpose == "production" }.collect { it.name }
}
doLast {
println springVersion
println emailNotification
productionSourceSets.get().each { println it }
}
}$ gradle -q printProperties 3.1.0.RELEASE build@master.org main plugin
Gradle uses special syntax for defining extra properties to ensure fail-fast behavior. This means Gradle will immediately detect if you try to set a property that hasn’t been declared, helping you catch mistakes early.
Extra properties are attached to the object that owns them (such as project).
Unlike local variables, extra properties have a wider scope, you can access them anywhere the owning object is visible, including from subprojects accessing their parent project’s properties.
Line-by-Line Execution
Gradle executes build scripts top to bottom during the configuration phase. That means:
-
Code is evaluated immediately in order.
-
Statements outside of configuration blocks execute eagerly.
-
Properties and logic should be deferred using
Provideror lazy APIs when possible (more on this in the next section).
This top-down execution model means the order of declarations can affect behavior, especially when using variables or configuring tasks.
Example Breakdown
Now, let’s take a look at an example and break it down:
plugins {   (1)
    id("application")
}

repositories {  (2)
    mavenCentral()
}

dependencies {  (3)
    testImplementation("org.junit.jupiter:junit-jupiter-engine:5.9.3")
    testRuntimeOnly("org.junit.platform:junit-platform-launcher")
    implementation("com.google.guava:guava:32.1.1-jre")
}

application {   (4)
    mainClass = "com.example.Main"
}

tasks.named<Test>("test") { (5)
    useJUnitPlatform()
}

tasks.named<Javadoc>("javadoc").configure {
    exclude("app/Internal*.java")
    exclude("app/internal/*")
}

tasks.register<Zip>("zip-reports") {
    from("Reports/")
    include("*")
    archiveFileName.set("Reports.zip")
    destinationDirectory.set(file("/dir"))
}plugins { (1)
id 'application'
}
repositories { (2)
mavenCentral()
}
dependencies { (3)
testImplementation 'org.junit.jupiter:junit-jupiter-engine:5.9.3'
testRuntimeOnly 'org.junit.platform:junit-platform-launcher'
implementation 'com.google.guava:guava:32.1.1-jre'
}
application { (4)
mainClass = 'com.example.Main'
}
tasks.named('test', Test) { (5)
useJUnitPlatform()
}
tasks.named('javadoc', Javadoc).configure {
exclude 'app/Internal*.java'
exclude 'app/internal/*'
}
tasks.register('zip-reports', Zip) {
from 'Reports/'
include '*'
archiveFileName = 'Reports.zip'
destinationDirectory = file('/dir')
}| 1 | Apply plugins to the build. |
| 2 | Define the locations where dependencies can be found. |
| 3 | Add dependencies. |
| 4 | Set properties. |
| 5 | Register and configure tasks. |
1. Apply plugins to the build
Plugins are used to extend Gradle. They are also used to modularize and reuse project configurations.
Plugins can be applied using the PluginDependenciesSpec plugins script block.
The plugins block is preferred:
plugins {   (1)
    id("application")
}plugins { (1)
id 'application'
}In the example, the application plugin, which is included with Gradle, has been applied, describing our project as a Java application.
2. Define the locations where dependencies can be found
A project generally has a number of dependencies it needs to do its work. Dependencies include plugins, libraries, or components that Gradle must download for the build to succeed.
The build script lets Gradle know where to look for the binaries of the dependencies. More than one location can be provided:
repositories {  (2)
    mavenCentral()
}repositories { (2)
mavenCentral()
}In the example, the guava library and the JetBrains Kotlin plugin (org.jetbrains.kotlin.jvm) will be downloaded from the Maven Central Repository.
3. Add dependencies
A project generally has a number of dependencies it needs to do its work. These dependencies are often libraries of precompiled classes that are imported in the project’s source code.
Dependencies are managed via configurations and are retrieved from repositories.
Use the DependencyHandler returned by Project.getDependencies() method to manage the dependencies.
Use the RepositoryHandler returned by Project.getRepositories() method to manage the repositories.
dependencies {  (3)
    testImplementation("org.junit.jupiter:junit-jupiter-engine:5.9.3")
    testRuntimeOnly("org.junit.platform:junit-platform-launcher")
    implementation("com.google.guava:guava:32.1.1-jre")
}dependencies { (3)
testImplementation 'org.junit.jupiter:junit-jupiter-engine:5.9.3'
testRuntimeOnly 'org.junit.platform:junit-platform-launcher'
implementation 'com.google.guava:guava:32.1.1-jre'
}In the example, the application code uses Google’s guava libraries.
Guava provides utility methods for collections, caching, primitives support, concurrency, common annotations, string processing, I/O, and validations.
4. Set properties
A plugin can add properties and methods to a project using extensions.
The Project object has an associated ExtensionContainer object that contains all the settings and properties for the plugins that have been applied to the project.
In the example, the application plugin added an application property, which is used to detail the main class of our Java application:
application {   (4)
    mainClass = "com.example.Main"
}application { (4)
mainClass = 'com.example.Main'
}5. Register and configure tasks
Tasks perform some basic piece of work, such as compiling classes, or running unit tests, or zipping up a WAR file.
While tasks are typically defined in plugins, you may need to register or configure tasks in build scripts.
Registering a task adds the task to your project.
You can register tasks in a project using the TaskContainer.register(java.lang.String) method:
tasks.register<Zip>("zip-reports") {
    from("Reports/")
    include("*")
    archiveFileName.set("Reports.zip")
    destinationDirectory.set(file("/dir"))
}tasks.register('zip-reports', Zip) {
from 'Reports/'
include '*'
archiveFileName = 'Reports.zip'
destinationDirectory = file('/dir')
}You may have seen usage of the TaskContainer.create(java.lang.String) method which should be avoided.
tasks.create<Zip>("zip-reports") { }
register(), which enables task configuration avoidance, is preferred over create().
|
You can locate a task to configure it using the TaskCollection.named(java.lang.String) method:
tasks.named<Test>("test") { (5)
    useJUnitPlatform()
}tasks.named('test', Test) { (5)
useJUnitPlatform()
}The example below configures the Javadoc task to automatically generate HTML documentation from Java code:
tasks.named<Javadoc>("javadoc").configure {
    exclude("app/Internal*.java")
    exclude("app/internal/*")
}tasks.named('javadoc', Javadoc).configure {
exclude 'app/Internal*.java'
exclude 'app/internal/*'
}Accessing Project Properties in Build Scripts
In a Gradle build script, you can refer to project-level properties like name, version, or group without needing to qualify them with project:
println(name)
println(project.name)println name
println project.name$ gradle -q check project-api project-api
This works because of how Gradle evaluates build scripts:
-
In Groovy, Gradle dynamically delegates unqualified references like
nameto theProjectobject. -
In Kotlin, the build script is compiled as an extension of the
Projecttype, so you can directly access its properties.
While you can always use project.name to be explicit, using the shorthand name is common and safe in most situations.
Accessing Settings Properties in Settings Scripts
Just like build scripts operate within a Project context, settings scripts (settings.gradle(.kts)) operate within a Settings context.
This means you can refer to properties and methods available on the Settings object, often without qualification.
For example:
println(rootProject.name)
println(name)
In a settings.gradle(.kts) script, both of these print the name of the root project.
That’s because:
-
In Groovy, unqualified property references like
nameare dynamically delegated to theSettingsobject. -
In Kotlin, the script is compiled as an extension of the
Settingsclass, sonameandpluginManagement {}are directly accessible.
Unlike in build scripts, where name refers to the current subproject, in settings scripts name typically refers to the root project name, and it can be set explicitly:
rootProject.name = "my-awesome-project"Default Script Imports
To make build scripts more concise, Gradle automatically adds a set of import statements to scripts.
As a result, instead of writing throw new org.gradle.api.tasks.StopExecutionException(), you can write throw new StopExecutionException().
Next Step: Learn about Gradle Managed Types >>